A backpack producer is a term used to describe a producer who is able to work on a film or video production with minimal equipment and a small team. The term “backpack” refers to the idea that the producer is able to carry all the necessary equipment in a backpack, allowing them to be mobile and work in a variety of settings without the need for large crews or expensive equipment.
A backpack producer is typically someone who is able to handle multiple roles on a production, such as producer, director, and camera operator. They may have a small team of assistants, but are able to handle many aspects of the production themselves. This type of producer is often found in independent film productions or smaller-scale video productions, where budgets are limited and there is a need for flexibility and mobility.
The term “backpack producer” has also been used to describe a new breed of digital content creators who produce content primarily for online platforms like YouTube, Instagram, or TikTok. These producers are able to create content quickly and inexpensively using a variety of portable devices, such as smartphones or small cameras, and often work independently or with a small team.
Backpack producer’s gear for remote production in Europe
I am reminded of how artists develop methods to create their work. In 1991, I was at Paramount Studios working as an office production temp and a director’s assistant to Bruce Robinson, who was in the completion stages of his script “Jennifer Eight.” The film had yet to receive a green light from the studio. Robinson was grappling with making required changes and script rewrites. Since he was the type who banged scripts out with a typewriter, I was hired because I knew how to use a computer and scriptwriting software like Final Draft, which was new on the market.
Robinson’s script style was a challenge to reformat and update. Besides justifying the left margin with a simple carriage return, the right margin was filled with misspellings, unnecessary spacing, and other things to maintain a clean line on that side. Later, he would reveal how he enjoyed repairing antique Swiss watches. There wasn’t a need to justify the script’s right margin, but as he explained, it helped him focus on the creative process. Perhaps the system and methods I outlined in this post about making a documentary are similar to mine in that regard. As I’ve always said, find what works for you and let it become your muse.
Better Be Brilliant!
Better Be Brilliant!
BRUCE ROBINSON – SCREENWRITER, DIRECTOR
For those unaware of Robinson’s work, he is arguably most famous for writing and directing the cult classic “Withnail and I” (1987). The film possesses comedic and tragic elements, and is set in London in the late 1960s, where Robinson revisited his youthful experiences as a “chronic alcoholic and resting actor, living in squalor.”
Nominal releases (35.3%): movies that have theatrical release dates, but reported no box office figures. This could happen when a filmmaker rents a theater to show their movie to a small audience, for example.
Small releases (8.1%): movies that reported grosses up to $100,000
Large releases (17%): movies that reported grosses over $100,000
The remaining 39.6% of films indexed got no theatrical release, though may have premiered at a theater or played in film festivals. Others were released straight to streaming platforms.
“You should accept the fact that you can get there, but do not expect to make money on your theatrical release.” –
Bruce Nash, The Numbers
Note the irony that Avengers Endgame was opening right same night on April 25, 2019
Before considering Self-Distribution
Make a film that people will want to see (seriously!)
Test screen to audiences, respond to their feedback
Meet all cinema standards, i.e. professional audio mix
Market for placement in a crowded film market with a compelling title and poster art
“If you thought making the film took a long time, getting your film properly monetized takes 4 times longer.”
Michael M. Conti, Filmmaker
Disclaimer: Our approach worked for a 70 minute inspirational doc, not narrative or dramatic feature.
Note that the game changer from Netflix, ROMA, was playing on the big screen too.
Results after Self-Distribution
Sixty-one theatrical screenings in 20 cities in 7 states within one year, 2 in the UK.
Thirty-one screenings in one month alone! #EarthMonth
Over five thousand paying audience members experienced the film in theaters or other venues
Net income from each tour covered expenses for travel, rentals and marketing costs.
Monetizing the film justifies the initial costs to make the film
Today, I can see the summit. I envisioned the final result of “The Unruly Mystic: John Muir” on the first day of principal photography in May 2015. I would spend 18-months interviewing people and traveling throughout the US and Canada. After three months of editing, I could see the film’s outline above the trees.
There were multiple steps taken to achieve this editing milestone. I will explain my process and approach to encourage others with their filmmaking projects by providing specific details. There are many articles and books available on the editing process, but I want to share what worked for me.
I will focus on what happens after filming has been completed. This post primarily addresses the editing process rather than production. It also requires a working understanding of Adobe Premiere and will help you understand it as a database tool rather than a visual means to edit video.
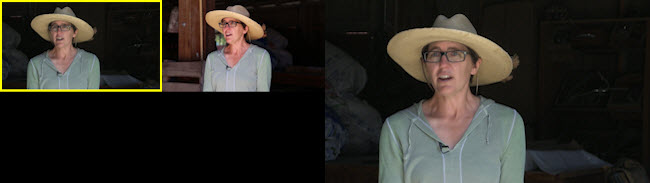
Multi-camera monitor
Information is readily available on how to capture great shots and sound using a two-camera setup. To assist with the editing process, it is essential to ask your interview subjects the same questions so you’ll have a variety of responses on one topic.
Defining Your Topic of Interest
Michael’s notebook
First I asked each subject to share their favorite John Muir story and suggested one when Muir climbed a tree during a thunderstorm. In doing so, I could retell the story using multiple narrators. This approach was also useful with other questions, which is why you should establish the focus of your film before production begins. I wrote an outline on the topics I thought would be relevant and kept it with me throughout filming and editing.
Since I work with Adobe Premiere Pro (PrPro), I know from previous documentary productions that I don’t want to edit interview sequences in their original MXF* files. I have experienced instances where an original file was corrupted or “lost” that ruined an entire sequence when I was ready to export it. This step allows me to keep the “original” files off-site while working with a facsimile of the original footage. Each file became a new MXF by exporting a sequence after importing the original files. *MXF is the output for a 1.9 GB video file when shooting with a Canon XF 100.
Footage preparation
I re-import the facsimile MXF files, create a multi-camera edit, and then add a timecode to the sequence. It isn’t necessary to edit back and forth between the cameras during this step of the editing process. You need one camera angle (preferably front) and the best audio file to begin exporting but in a lower resolution to upload the file online with an embedded timecode for an H.264 file.
Transcription
The H.264 file is the resource for the next step. I didn’t have the luxury of using this when making my previous documentary. This involves creating a transcription of the interviews in a Word file based on the timecodes. There are multiple businesses that provide this service and I was happy with the one I chose. On average, prices are roughly $100 for an hour of footage and billed by the minute. The benefits are worth the expense based on the variety of ways you can use the transcriptions.
Colored Topics
The following process is one that I created and worked best for me. Once I had the transcriptions, I reviewed each document with different color markers. I had previously outlined the topics, assigning them different colors.
Transcription Binder
By implementing the idea of hearing the John Muir tree story retold multiple times, I would highlight that section. There could be multiple themes I was following and I would do the same for those.
Interview Sequence Marking
After I went through the 15-page document, I would open the multi-cam sequence in PrPro and mark each beginning point for the timeline topic.
I would also copy and paste from the Word file the specific transcription sentence or paragraph into the marker’s description. I would also color code the marker to match the highlighter for future reference in the sequence. Next, I would place a cut at the marker in-point and another at the end of the edit. The clip would be nested with the same description from the transcription.
The Matt Fox timeline looked like the following:
Sequence with color markers in place
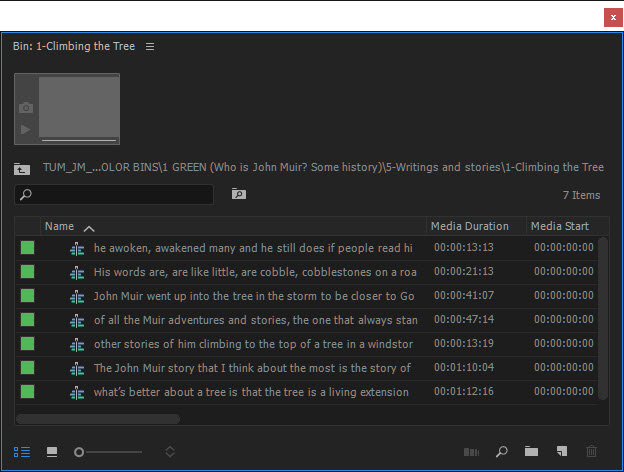
Descriptive nested sequence and themed topic bin
After creating a descriptive nested sequence, I could drop the file into a bin for similar topics. Ideally, you want a manageable number of bins for the nested sequences. Once in their bin, I made sure the nested sequences had a uniform color (i.e. green for forest) so I would know if I had used the clip after creating a new sequence for a rough cut. Once I used the clip in the new sequence, I would return it to the project folder from the edited sequence with a smartkey I made (Alt+D). I would change the color to red (rose). While PrPro can reveal clips that are being reused in a sequence, it won’t do the same for nested sequences.
Topic Bin before changing labels based upon usage in the edit
While I didn’t create descriptive nested sequences into specific bins until I completed my interviews, you can do this after each interview but it’s important to be open to the entire spectrum of the interview footage. This helps you refresh your memory by reading the transcriptions and highlighting the essential dialogue related to your chosen topics. This is important when interviewing several people overover a long period. If the interviews are short and few, you can start earlier. I had one hour of footage for each of the 15 interviews.
Now that I have my nested descriptive sequences into their bins, I can select those sequences and make a new sequence for editing. I like to know who is speaking (thumbnails are not available with nested sequences), so I would go through the clips and assign a color to each speaker. I could also randomly place the clips so that no two clips followed in the same color.
Because the topic was similar, there was no harm in doing this as I could move the clips when I started editing. This process would lead to new discoveries while editing.
Edited sequence showing label colors per speaker and descriptive mouse-over
I noticed each bin consisted of 10 minutes of material from 20 clips. I treated rach sequence as a separate film, I could watch the sequence, move the clips to improve the flow, and clean up the dialogue at the in and out points at the original nested sequence. Ideally, you should do this in the edited sequence, but I didn’t always have access to the visual cue of the waveform on a particular sequence without rendering it again.
Conclusion
With a new sequence created with this process, I could start editing on the themed topic bin. I knew I had the relevant descriptive nested clips in one bin, so I could find where I took that clip in the original interview by reviewing the descriptive markers on the sequence. I designed a method that noted which clip was used and could double click any nested clip to open the descriptive nested sequence to access each individual multi-cam edit. This was helpful in cutting back and forth between two cameras to improve dialogue edits after I decided on my final edit.